Related Topics
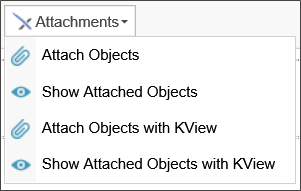
 Attach Objects
This control enables users to add document attachments to the Process or Form.
Control Properties
Double clicking the control allows you to access and configure its properties.
As of Apple iOS 6.2, when clicking on the Attach button in Safari or Chrome, iOS will prompt the user to either take a picture or select one to attach from his photo library.
In addition, the Attach Objects control also allows you to call JavaScript client behaviors. You can specify the JavaScript call you'd like to make by entering it in the OnClientClick property of the control.
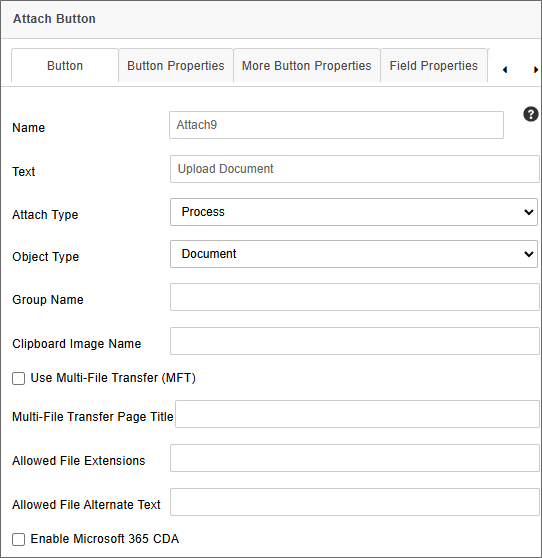
The Properties dialog for this control has a number of configurable tabs.
Button Tab
The Button tab is the primary configuration tab for the control, and contains the properties listed below.
Name: The Control Name.
Text: The Text that will appear on the button's label.
Attach Type: Determines to which Process Director object the item will be attached. You can set the item to attach to the following objects:
- Form
- Workflow
- Timeline
- Process
The default selection is "Process".
Object Type: Determines whether the item to be attached is a document/file, or a clipboard image item that will be attached from the machine's clipboard memory. The default is "Document".
 The "Clipboard" selection is largely deprecated, as it requires ActiveX technology that works only with Internet Explorer when the BP Logix plugin is installed, and is running on a 32-bit computer.
Group Name: The Group Name of the group to which the item will be attached.
 As a best practice, you should always apply Group Names for attachments, even if you only have a single attachment control, or a just a single document to attach. This will make your life much easier if you later want to export just certain documents, or access just certain types of forms in a process.
Clipboard Image Name: If the attachment item comes from the clipboard, this property will assign a file name to the item. Please see the note in Object Type above for the clipboard's operability.
Use MFT Support?: Selecting this property will enable users to upload multiple files to form asynchronously. When the files are uploading, a separate, pop-up, upload window will appear in the browser. This window MUST remain open for the uploads to complete. Closing prematurely will stop the uploads. In the meantime, while the upload is being completed, you can continue filling out the form without waiting on the uploads. When using this feature, in Process Director v5.12 or higher, the Show Attach control will display the % complete of the uploaded file, and the tooltip with display the last time data was received. This can be used by a user to determine if they accidentally closed the browser window doing the upload, and remove the file and upload again.
Large file uploads may require that you specify a temporary folder for the file during MFT uploads, in lieu of the default temp folder, as sometimes large documents get caught in the temp folder. To alleviate this, you can set the UploadTempPath Custom Variable to the folder you'd like to use for temporary storage.
MFT Page Title: This property enables you to configure the title of the upload window that will be displayed to the user when the file upload begins.
Allowed File Extensions: This property accepts a comma-separated list of file extensions (e.g. docx,xlxs,pdf). At run-time, only files with the specified extensions can be uploaded. Optionally, there is a Custom Variable called FileUploadBlacklist that also accepts a comma-separated list of file extensions to create a blacklist that will reject all file uploads of the enumerated file types. If no extensions are entered in the Attachment control, then all file types can be uploaded, with the exception of any that may be in the FileUploadBlacklist. For Process Director v5.26 and higher, the allowed file types are displayed to the user when uploading a file attachment.
Allowed File Alternate Text: This property enables you to specify the text you'd like to display to the user when you use the Allowed File Extensions property to restrict file types for upload. This property can be set universally through the use of the FileUploadBlacklistAlternateText Custom Variable.
Enable Microsoft 365 CDA: This property is available in Process Director v3.1.500 and higher, and is relevant only to customers who use the separately-licensed Collaborative Document Authoring component with Microsoft 365 as the document editing service. When using the service, you must ensure this property is checked. You should also ensure that the setup of M365 CDA has been completed before attempting to set this property.
Button Properties Tab
This tab enables you to configure additional properties for the Attach button.
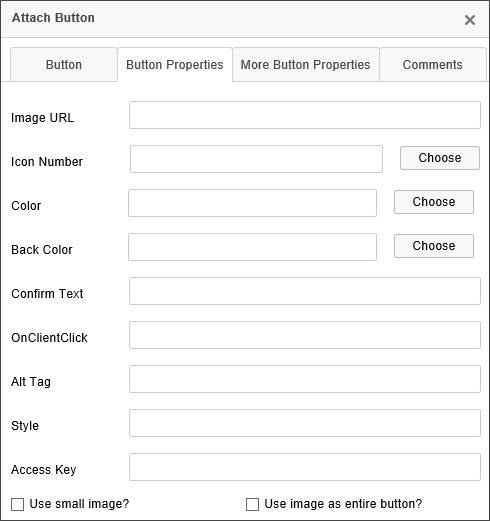
Image URL: The button can be displayed as an image by providing an accessible image URL to display instead of a standard button. This property will override other button properties below, e.g., Back Color.
Icon Number: You can select an Icon to display on the button from the Icon Chooser.
Color: You can select the text color to display on the button from the Select Color dialog box.
Back Color: You can select the background color to display on the button from the Select Color dialog box.
Confirm Text: You can specify confirmation text that will appear as a confirmation dialog box when the button is clicked.
onClientClick: You can specify client-side JavaScript to run on the button's onClientClick event.
Alt Tag: You can specify an ALT tag property for accessibility purposes.
Accessibility Key: You can specify the accessibility keys a user can press to activate the button, for accessibility purposes.
onClientClick: You can specify client-side JavaScript to run on the button's onClientClick event.
Use Small Image?: If you supply an image URL, the image can be displayed as an icon for the button by checking this property.
Use Image as entire button?: You can use the image as the displayed button, rather than displaying a traditional button on the form.
More Button Properties Tab
Additional properties are configured on this tab.
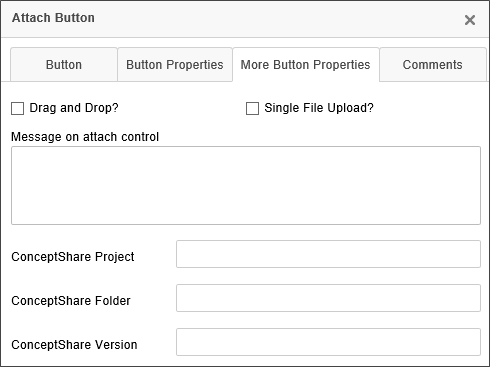
Drag and Drop?: Selecting this property will enable users to drag a file from the file system directly onto the Form to upload it.
Single File Upload?: Selecting this property will restrict each upload to a single file.
Message on Attach Control: You can display a longer message on the attach control, in addition to the button text. This may be useful for supplying instructions, etc., to the user.
For Process Director v6.1.200 and below, some additional ConceptShare Properties appear on this tab.
ConceptShare Project: Users of ConceptShare can specify a Project to assign to the attachment.
ConceptShare Folder: Users of ConceptShare can specify a Folder to assign to the attachment.
ConceptShare Version: Users of ConceptShare can specify a Version to assign to the attachment.
 The ConceptShare properties were removed from Process Director v6.1.300, along with all other support for ConceptShare.
Form Definition Properties
Additional properties are available for the Attach Objects control in the Form Controls Tab of the form definition. Opening the control's property in the Form Controls tab will display the properties dialog box to access the additional properties.
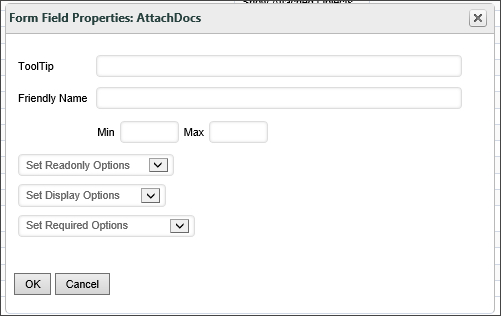
The relevant properties are:
|
PROPERTY |
DESCRIPTION |
|---|---|
|
Min |
The minimum allowable file size for the attachment, in Kilobytes, e.g., a value of "64" would be a size limit of 64KB. |
|
Max |
The maximum allowable file size for the attachment, in Kilobytes, e.g., a value of "64" would be a size limit of 64KB. |
 For Process Director v5.32 and higher, attachments may be added to completed processes. Prior versions don't allow post-completion attachments.
 Show Attached Objects

This control displays the document attachments that you uploaded via the Attach control described above. The Properties dialog for the Show Attached Objects control has two configuration tabs.
Attach Tab
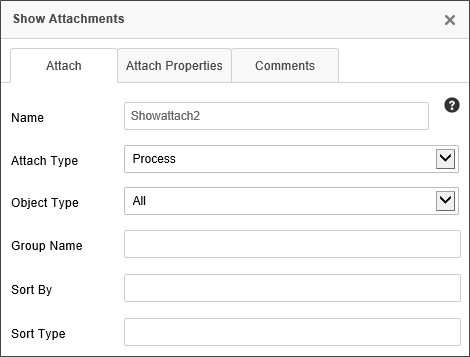
The primary properties to configure are found on the Attach tab.
You must ensure that the Attach Type, Object Type and Group Name properties are the same properties you configured for the ShowAttach control, if you want to show the specific documents that were uploaded via that Attach control. For the Object Type option, however, you have an option to show All attachments, in addition to Form or Process attachments specifically.
Setting the Group Name property to "" will only display attachments that have no Group Name associated with the attachment, while leaving it blank will show all attachments of that Attach Type and Object Type. An additional Object Type, "Case", is available to display objects that are attached to the Case instance.
For Process Director v5.26 and higher, you can also use the percent sign (%) as a wildcard character to match a partial Group Name. For example, if you have two groups named "Final Drafts" and Final Documents", setting the Group Name to "Final%" will return attachments in both groups. This functionality can be disabled using the fEnableOldShowAttach custom variable.
For Process Director v5.31 and higher, specific Group Names can be excluded from display by using the "!" character with the group name, e.g., "!MyGroup" will exclude items from the group named "MyGroup".
 As a best practice, you should always apply Group Names for attachments, even if you only have a single attachment control, or a just a single document to attach. This will make your life much easier if you later want to export just certain documents, or access just certain types of forms in a process.
Additional configurable properties on the Attach tab are the Sort By property, which will sort the display of attachments by Name or Date. The Sort Type will sort in Ascending or Descending order. The text values that are valid for these properties are:
Sort By Options
- Name - The name of the attachment.
- CreateTime - The date and time the attachment was created.
- UpdateTime - The date and time that the attachment was last edited.
Sort Type Options
- Ascending
- Descending
For Process Director v5.38 and higher, when an anonymous user is assigned a task via an email and they attach a document to a form, the document's "Create User" attribute will display the anonymous user's email address on the Show Attached Objects control.
Attach Properties Tab
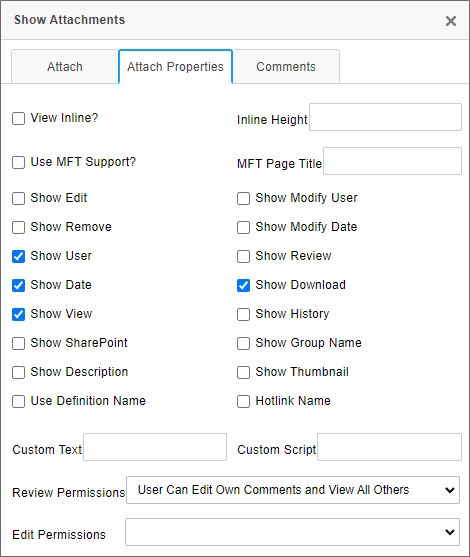
This control offers a variety of options to display information in the control when it is displayed. If you are displaying Process Timeline/Workflow/Process references, the ShowAttach control won't display the current form despite the fact that it is a Process Timeline/Workflow/Process reference.
The default settings for this control are shown above. Most are fairly obvious but a few require more explanation.
By default, the ShowAttach control doesn't display the attached object in the browser, but just adds a link to be able to download or view it. To show it within the browser, check the View Inline? checkbox. You may then configure the Inline Height property to specify how large, vertically, in pixels, the inline display of the attachments will be when the form is displayed.
Process Director versions 3.45 and higher have the ability to show thumbnails in the ShowAttach control by selecting the Show Thumbnail check box. Thumbnail display is available for the following file types:
- JPG/GIF/PNG/TIF/BMP
- DOC/DOCX
- XLS/XLSX
- PPT/PPTX
- TXT/CSV
If you check the Show Edit check box, an Edit link will appear in the control to allow the user to checkout and download the attachment for editing. When they do so, an Upload and Cancel links will appear. When the document is uploaded or canceled, the file will be checked back in or the checkout voided, depending on what you choose. When the Edit feature is enabled, you can also select the Use MFT Support property to upload the edited file asynchronously. When the file is uploading, a separate, pop-up, upload window will appear in the browser. This window MUST remain open for the upload to complete. Closing prematurely will stop the upload. In the meantime, while the upload is being completed, you can continue filling out the form without waiting on the upload. The MFT Page Title property enables you to configure the title of the upload window that will be displayed to the user when the file upload begins. Additionally, an Administrator can use Debug Mode to set the status to complete from the document properties page, if necessary.
For Process Director v5.34 and higher, when a Download ink is displayed in the ShowAttach control for a document that has been converted to PDF, the download action will download the version of the attachment that was converted to PDF.
Collaborative Document Authoring
For Cloud installations of Process Director v5.13 and higher, document attachments may be edited using Collaborative Document Authoring, as an optionally licensed component. If both the Show Edit and Use Online Editor properties are checked, clicking the Edit link in the running form will open the document in an online document editor for Word, Excel, or PowerPoint, instead of downloading a copy of the document to the local computer. Change tracking is automatically enabled in Collaborative Document Authoring, so that edits from multiple authors can be reconciled, accepted, or rejected.
The Edit Permissions property enables you to set the edit methods for collaborative authoring. The following options are available:
- Default Checkout and Edit: Checks out the document for offline editing and check-in.
- Online Editor Edit Only: Allows editing only in the Collaborative Document Authoring UI.
- Online Editor Track Changes On: Allows editing in the Collaborative Document Authoring UI, with Track Changes turned on.
- Online Editor Review Changes: Allows editing in the Collaborative Document Authoring UI, with Track Changes turned on, and enables users to review/accept changes.
Collaborative Document Markup
For users of Process Director v5.13 and higher, document attachments may be annotated using Collaborative Document Markup, as an optionally licensed component. To enable this, check the Show Review property. Clicking the Review link in the running form will open the Markup tool. For more information on the use of this tool, please refer to the Collaborative Document Markup topic.
Markups/comments may be added, edited, or deleted by end users using the Markup tool, depending on the setting you select from the Review Permissions dropdown control. The following options are available:
- No Comments (default): No commenting is allowed.
- User Can View Comments: Users can view only their own comments.
- View All Users Comments: Users can view all comments.
- User Can Edit Comments and View Others: Users can view all comments, but edit only their own.
- Edit All Users Comments: Users can edit/delete all comments by any user.
Additional Custom Variable Settings
There are also some settings you can make to the Customization file to alter the way the ShowAttach control works.
For thumbnails to display, you must also set the fEnableThumbnails custom variable to "True" in the Customization File.
Also, for Process Director v3.45 and higher, when selecting the Show Edit? option, Process Director will no longer display the History tab in the popup. If a user requires access to the history of a document from the Form, select the Show History? property to display a link on the form that opens a popup to the document history.
As a default, if the ShowAttach control is disabled, the History tab won't display. This behavior can be changed by setting the ShowDocHistoryWhenDisabled custom variable to "true".
Custom Text/Script: Custom text and custom JavaScript can be added to an attachment displayed on a form. Simply enter the custom text or JavaScript into the provided text boxes to display the desired text or run the JavaScript code when the form is displayed.
 Attach Objects With KView
This control enables you to attach an object to a Form instance by browsing for the object using a Knowledge View.
 To configure the Knowledge View that you wish to display in this control, set the Default Value of the control to a “Content Item” in the control's Form field properties on the Form Controls tab of the Form definition, then point to the appropriate Knowledge View.
This configuration must be done in addition to
any configuration settings you configure in the Online Form Designer as part of the control's properties.
The primary control configuration for this control is done via the Button tab of the control's Properties dialog.
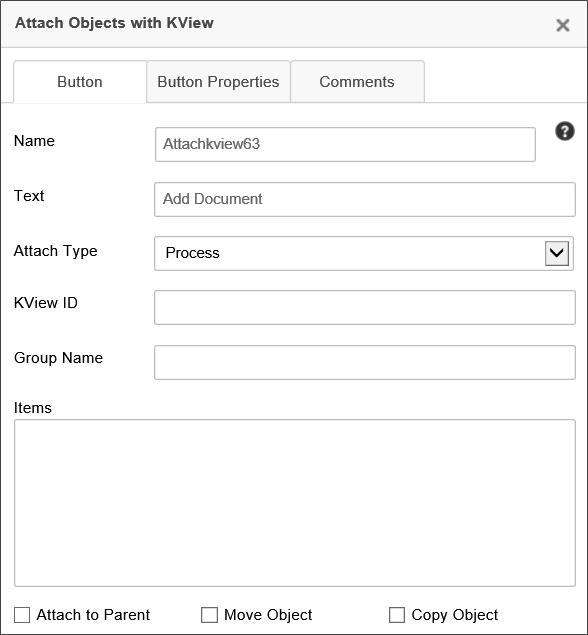
Name: The Control Name.
Text: The Text that will appear on the button's label.
Attach Type: Determines to which Process Director object the item will be attached. You can set the item to attach to the following objects:
- Form
- Workflow
- Timeline
- Process
The default selection is "Process".
KView ID: This is the ID of the Knowledge View you wish to display to attach the object.
Group Name: Only display objects from the specified group
Items: A query string to send data to the Knowledge View.
AttachToParent: If checked, this object will be attached to the parent of this Form instance
Move Object: If checked, this object will be moved to a new location (removing the object in its old location)
Copy Object: If checked, this object will be copied to the new location (leaving the old object alone).
 Show Attach Objects With KView
This Form control will add an Iframe to the Form showing a Knowledge View of attached objects.
 To configure the Knowledge View that you wish to display in this control, set the Default Value of the control to a “Content Item” in the control's Form field properties on the Form Controls tab of the Form definition, then point to the appropriate Knowledge View.
This configuration must be done in addition to
any configuration settings you configure in the Online Form Designer as part of the control's properties.
The primary control configuration for this control is done via the Control tab of the control's Properties dialog.
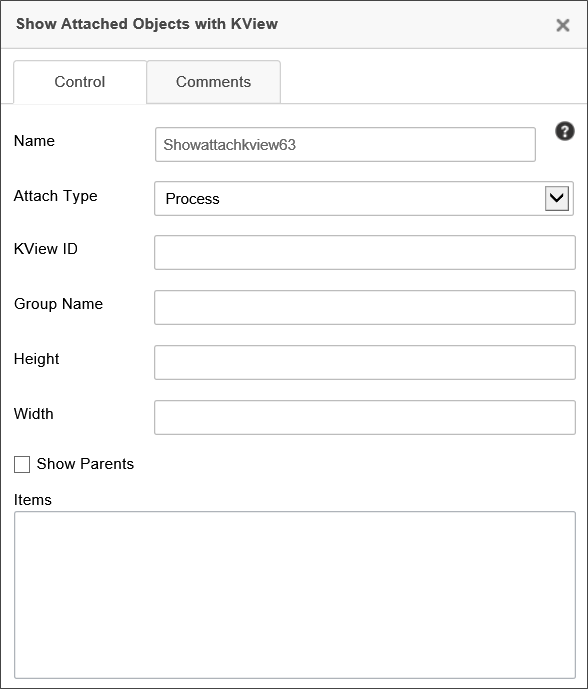
Name: The Control Name.
Attach Type: Determines to which Process Director object the item will be attached. You can set the item to attach to the following objects:
- Form
- Workflow
- Timeline
- Process
The default selection is "Process".
KView ID: This is the ID of the Knowledge View you wish to display to attach the object.
Group Name: Only display objects from the specified group
Height: Height of the Iframe.
Width: Width of the Iframe
ShowParents: If checked, the Knowledge View will show the parents of the object.
Items: A query string to send data to the Knowledge View.
Using Groups with Attachments
 As a best practice, you should always apply Group Names for attachments, even if you only have a single attachment control, or a just a single document to attach. This will make your life much easier if you later want to export just certain documents, or access just certain types of forms in a process, or many other things.
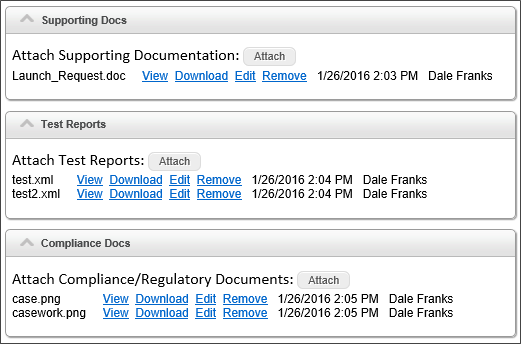
Both the Attach Objects and Show Attached Objects controls have a Group Name property, which is particularly useful when you need to enable users to upload more than one set of attachments. For example, let's say that during a process, different people must load different types of documents, as follows:
- Initial Requester: Supporting documents, invoices, etc.
- QA Section: Test reports
- Compliance Section: Regulatory documents
In this example, there are three different types of documents that need to be attached to the process or Form. While a single set of Attach Objects and Show Attached Objects controls will allow everyone to upload their documents, they would all be collected in a single set of attachments. The Group Name property enables you to place three sets of attachment controls on the Form, each with a different group name, so that each set of people can upload documents into a Form section that is specific to their group. The first set of Attach Objects and Show Attached Objects controls might have the Group Name "SupportingDocs", the second set would have theGroup Name "QA", and the third set might have the Group Name "Compliance". With this configuration, you can allow each group of people to upload documents only to the Group that is relevant to them, while disabling or hiding the other attachment groups, as desired, when the Form is being edited. As long as an Attach Objects control and a Show Attached Objects control share the same Group Name, Process Director will organize the attachments properly by group.
Other Control Tools
You can view the documentation for all tools available in the Online Form Designer by using the Table of Contents on the upper right corner of the page, or by clicking one of the links below.
Basic Controls: The most commonly-used form design tools.
Input Controls: Controls that are commonly used to collect data, but are a bit less widely used than the basic controls.
Other Input Controls: Additional Input controls, consisting mainly of the different content picker controls.
Actions: These controls enable you to control form actions, like placing buttons, or choosing objects via a picker,
Other Controls: Controls that perform miscellaneous tasks like adding HTML content, or labels.
Layout: Controls that are used to govern the control layout for the template, such as tabs and sections.
Responsive Layout: Controls that implement Bootstrap form layout objects.
Arrays: Controls that enable to you create and control arrays on the Form.
Data List (v6.0.100 and higher): Controls that enable the display of tabular data on a Form.
Form Control Tags: System Variables used to add controls to a Form, instead of using the UI controls.
Documentation Feedback and Questions
If you notice some way that this document can be improved, we're happy to hear your suggestions. Similarly, if you can't find an answer you're looking for, ask it via feedback. Simply click on the button below to provide us with your feedback or ask a question. Please remember, though, that not every issue can be addressed through documentation. So, if you have a specific technical issue with Process Director, please open a support ticket.

