Related Topics
 A PDF file for end-to-end Azure/Entra configuration for all Process Director features can be found here: Configuring Azure For Process Director (PDF Download)
The purpose of the SharePoint data source is to connect to a SharePoint List to retrieve documents or data. This datasource is a core feature of the product, and is not related to the use of the Collaborative Document Authoring (CDA) feature with Microsoft 365 (M365) in any way. CDA for M365 is a separately licensed feature, with its own setup and configuration process.
With the implementation of Microsoft's move to Modern Authentication, using the Microsoft identity platform, logging into cloud-based versions of SharePoint is no longer possible by simply using a user name and password. Legacy installations that user older versions of SharePoint may still do so, but SharePoint has largely implemented an OAuth-based authentication scheme, with additional security provided by the use of encryption certificates.
In Process Director v5.44.1000, Modern Authentication for SharePoint was implemented using the SharePoint OAuth Datasource, which only gives access to SharePoint at the Tenant (organizational) level.
For Process Director v5.44.1103, The SharePoint OAuth Datasource was renamed to SharePoint OAuth (Tenant), while a new Datasource SharePoint OAuth (Site), was added to give access to SharePoint at the Site level, rather than at the entire tenant.
The existing SharePoint Datasource, which uses the simple username/password authentication scheme, is still available for customers who are using older versions of SharePoint. This legacy authentication method should be relevant to only a very small minority of customers, and has been renamed to SharePoint Legacy.
 This update to the SharePoint Datasources will require updating the SharePoint Custom Tasks!
Configuring a SharePoint OAuth (Tenant) Datasource #
Modern Authentication provides much more secure access to SharePoint, but does require a more complex setup process for Tenant-based SharePoint installations.
Create the Registered Application for the Tenant
To set up Modern Authentication between SharePoint and Process Director, you must first create a Registered Application in Microsoft Entra. Please see the Tenant-Based SharePoint Configuration topic for instructions on how to complete this task.
Once you've created the Registered Application, you can begin the process for configuring SharePoint Online, as described below.
Configure SharePoint Online permissions #
To configure the application to use SharePoint with Process Director, you'll need to perform the following configuration steps:
- If you have access to multiple tenants, use the Directories + subscriptions filter in the top menu to switch to the tenant in which you want to register the application.
- Search for and select Azure Active Directory.
- Under Manage, select App registrations, then select your Process Director application. In this example, we'll use “Test SharePoint OAuth” as the Registered Application name, though, of course, the name you use may vary.
- Click API permissions.
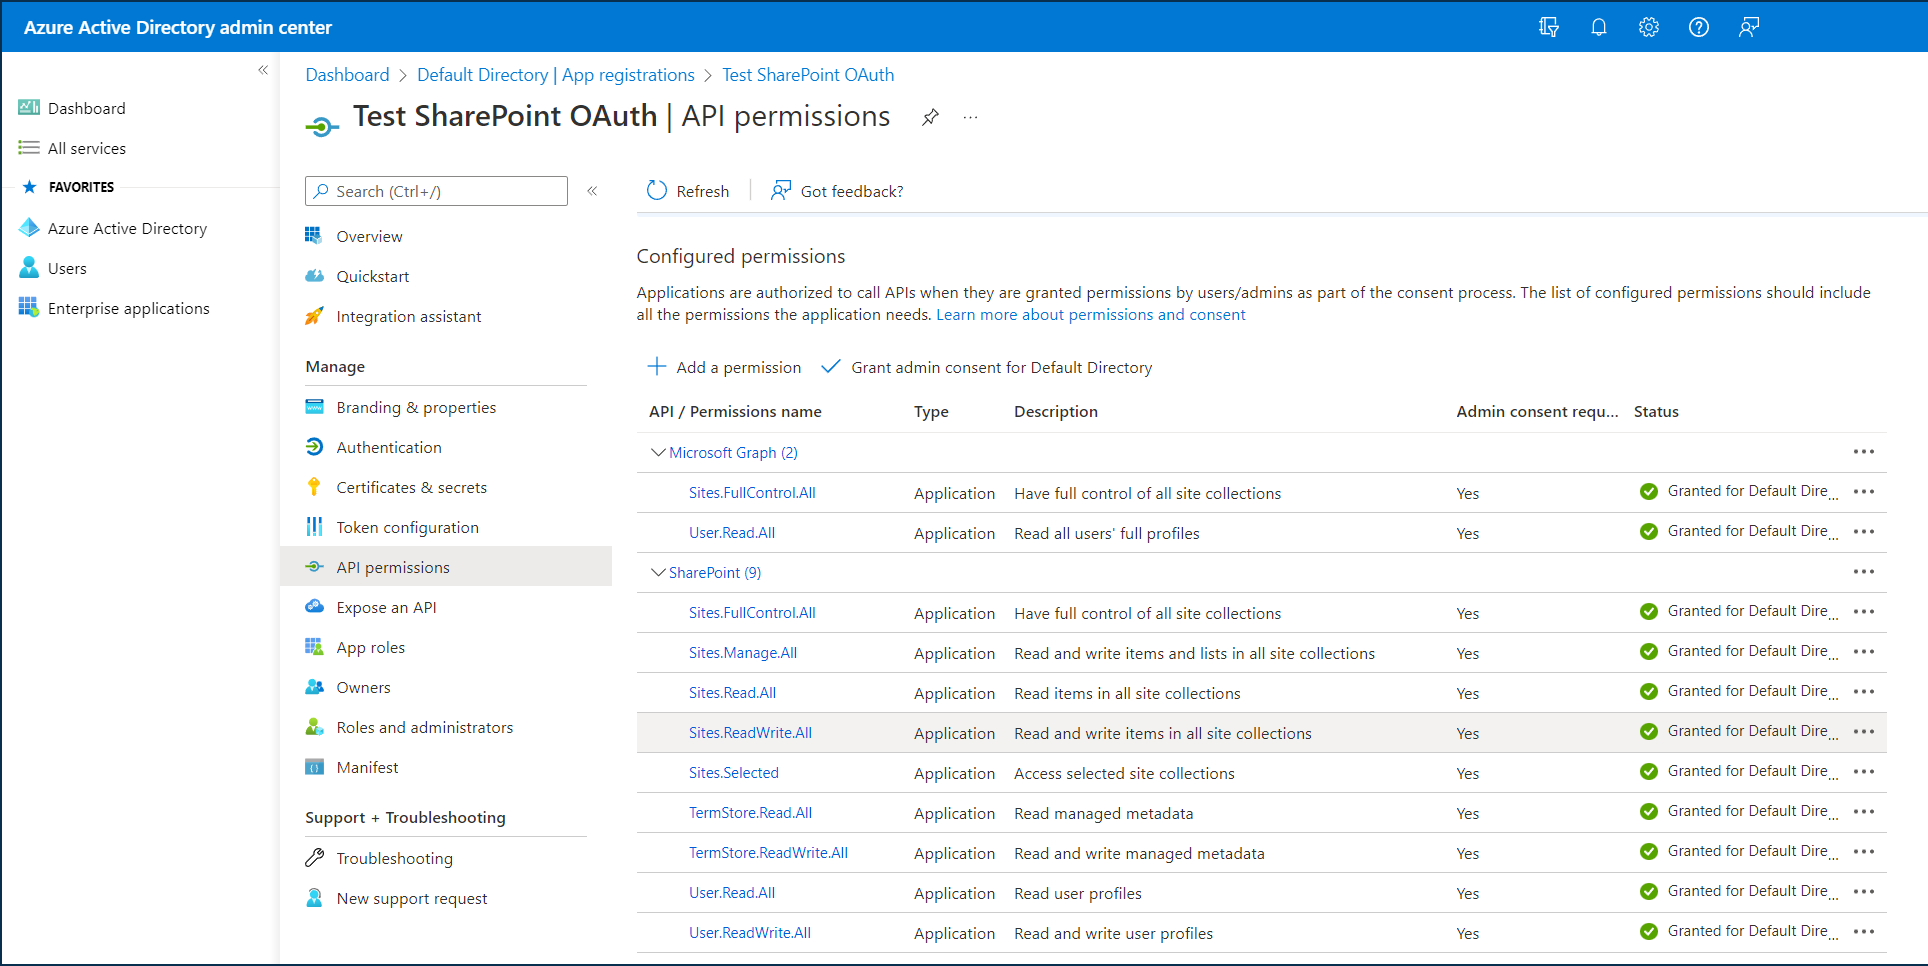
- Click Add a permission and add all permissions displayed below to the SharePoint section of the API Permissions area:
Create the SharePoint OAuth (Tenant) Datasource #
Now that the application has been fully registered in Azure, and the appropriate SharePoint API permissions have been set, you can create the SharePoint OAuth Datasource in Process Director. Be sure to keep the Azure window open, however, as you'll need to transfer some information from Azure to configure the SharePoint OAuth Datasource. Ensure you've opened the Entra admin center window to the Overview tab of the App registrations page of your Process Director integration app. In this example, we'll use the "Test SharePoint OAuth" application we used in the steps above.
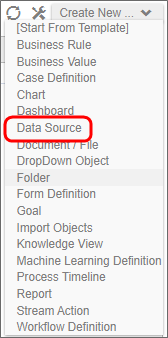
- Navigate to the Process Director folder in which you want to store the new Datasource, then select Data Source from the Create New menu.
- In the Create New Data Source screen, enter an Name for the Datasource, then click the OK button to create the Datasource and open its configuration screen.
- On the Properties tab of the Datasource definition, change the Datasource Type to "SharePoint OAuth (Tenant)".
- Set the SharePoint Site URL to the URL your SharePoint Online server.
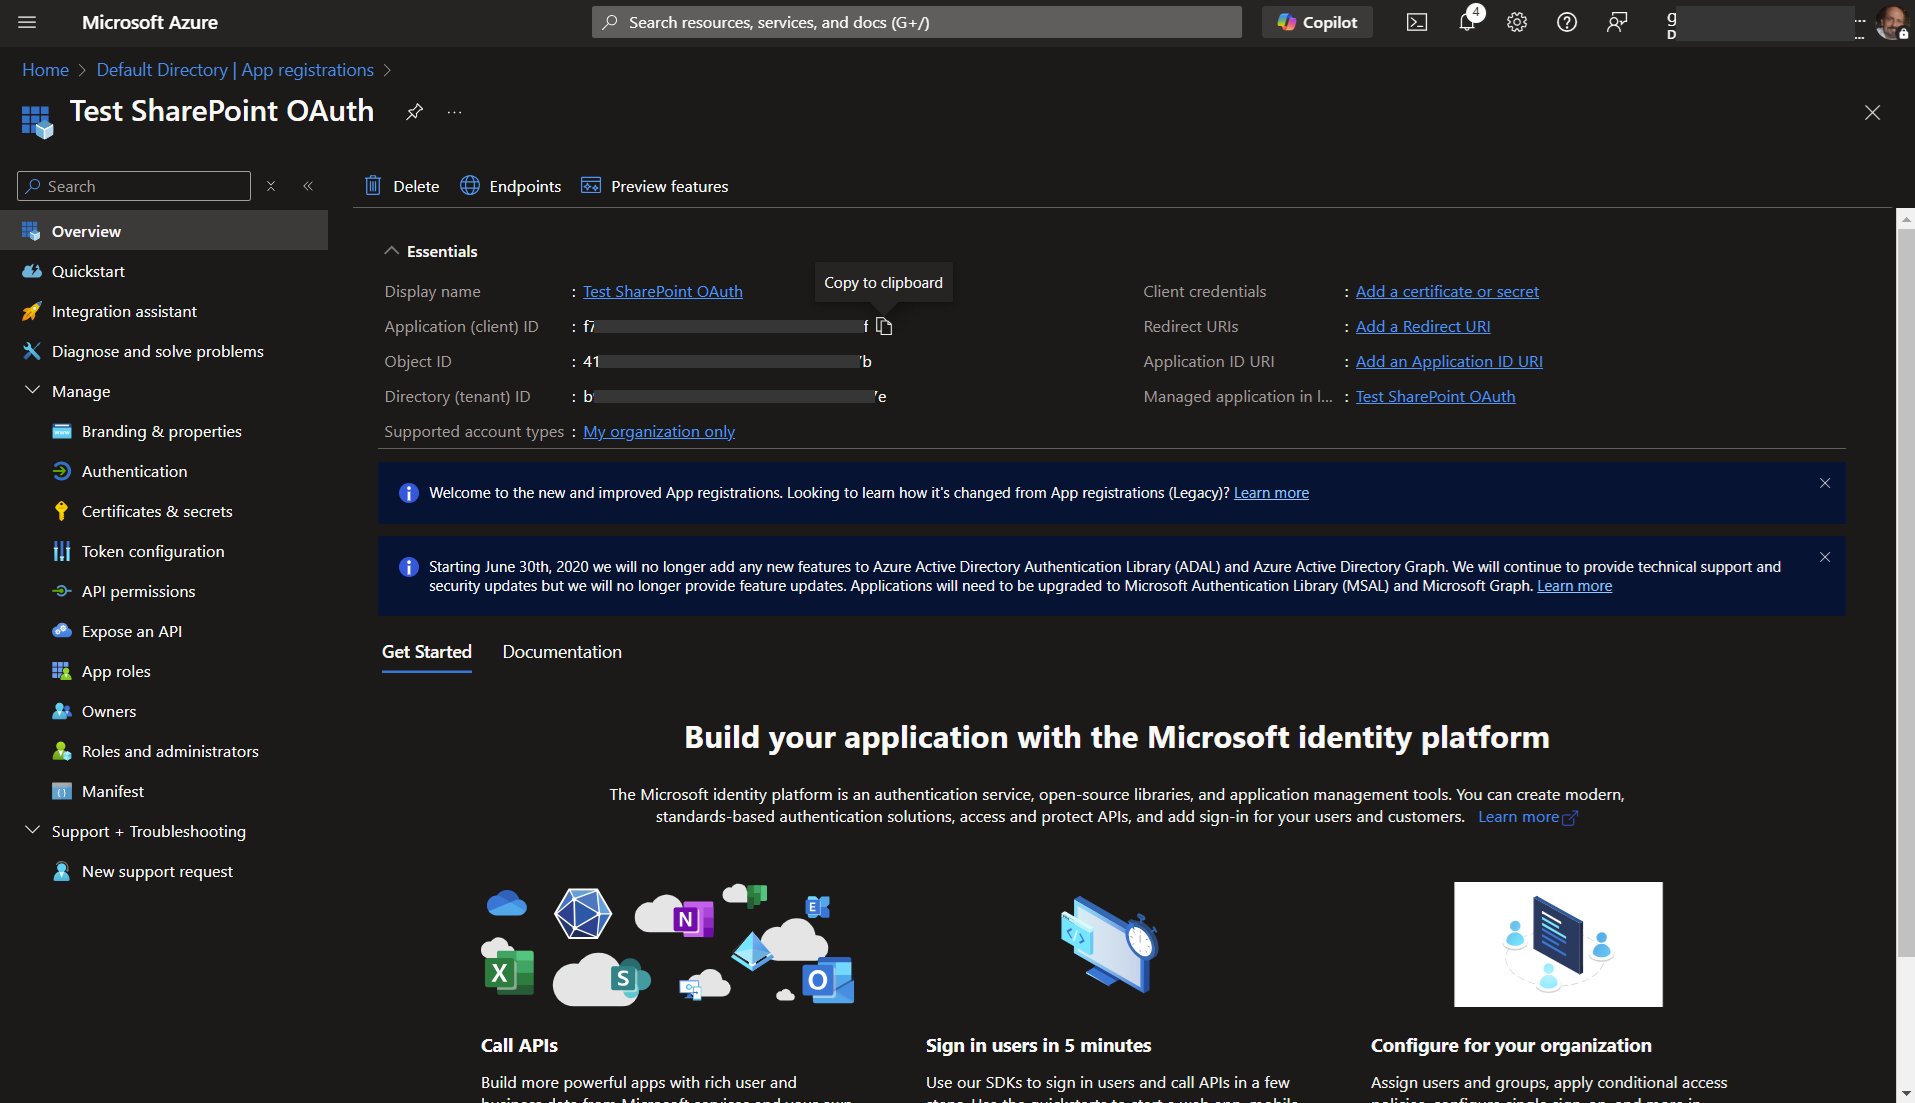
- To set the Client ID property, go to the Azure window, and using the "Copy to Clipboard" icon, copy the value in the Application (client) ID property, then paste it into the Client ID Property of the Datasource definition.
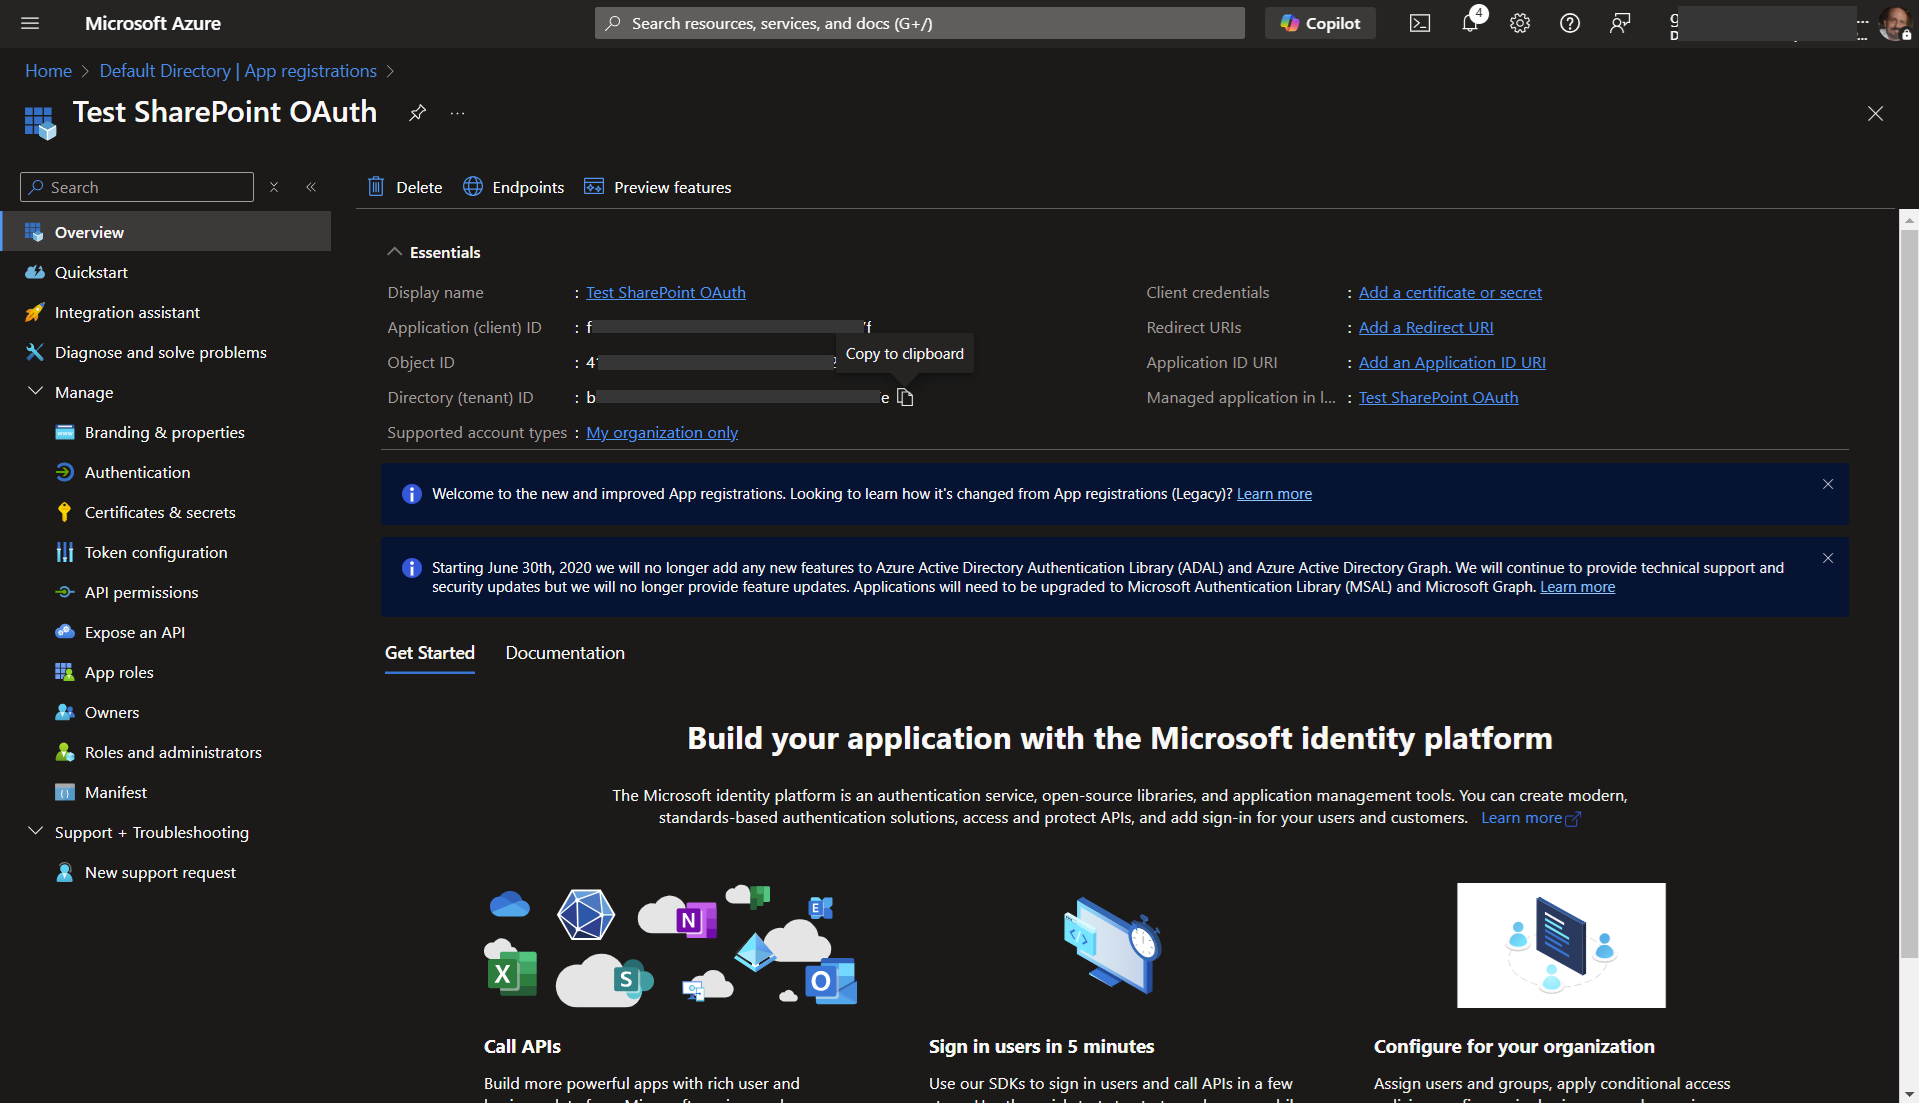
- Similarly, you'll need to copy the value of the Directory (tenant) ID property in Azure to the Tenant ID property of the Datasource definition.
- To set the certificate to use for this Datasource, click the Browse button for the SharePoint Certificate File property, then locate and select the PrivatePublicKeys.pfx file you created earlier (either with certreq.exe or PowerShell).
- Enter the certificate Password that you created for the PrivatePublicKeys.pfx file.
- Click the OK button to save your changes, then update the Datasource definition by selecting Update from the OK dropdown menu at the upper right corner of the page.
- Click the Test Connection button to ensure that the Datasource can connect properly to SharePoint.
SharePoint OAuth (Tenant) Datasource Properties
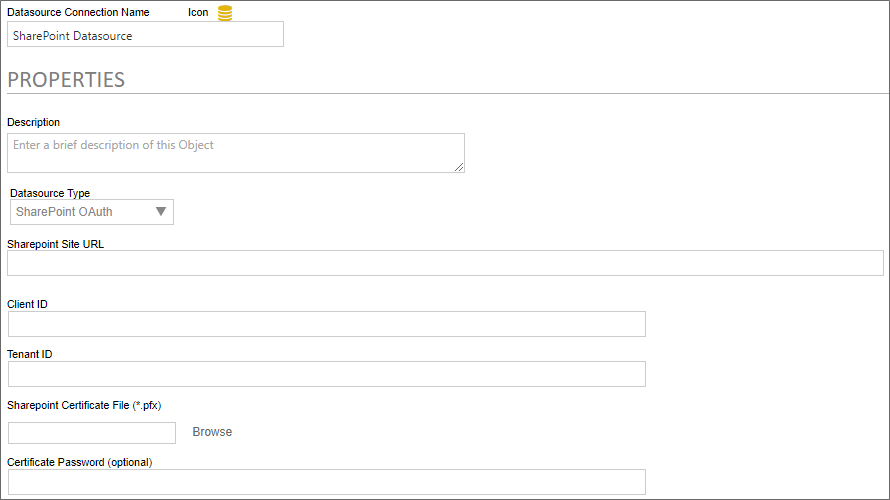
In addition to the standard Description property, setting the Datasource Type property to SharePoint OAuth enables configuration of the connection properties listed below.
The fully-qualified URL that connects to the SharePoint installation.
The value of the Application (client) ID property contained in the App Registration screen in Azure.
The value of the Directory (tenant) ID property contained in the App Registration screen in Azure.
A Content Picker than enables you to browse to and upload the certificate (.PFX) file to Azure.
The password that you configured for the certificate (.PFX) file when you created it.
Configuring the SharePoint OAuth (Site) Datasource #
 Microsoft has announced that the Site-level access to Azure/SharePoint resources will be terminated in April, 2026. The SharePoint OAuth (Site) datasource will, at that time, cease operating for Azure/SharePoint resources. While the use of this datasource type MAY continue to work for on-premise SharePoint installations, access to Azure-based resources will be ended by Microsoft. Only Tenant-level access will be allowed after that point, so onlty the SharePoint OAuth (Tenant)datasource will remain operational.
Configuring the SharePoint OAuth (Site) Datasource is far less complex than configuring the tenant-level Datasource, and requires no certificate to be created or uploaded to Azure. To add Process Director as an application in your Azure Active Directory portal at the Site level, complete the steps below after signing into your Azure portal (portal.azure.com):
- Navigate to the site you want to configure access for in your tenant. This is typically of the form
https://mytenant.sharepoint.com, replacing “mytenant” with the appropriate name. - Adjust the URL to
https://mytenant.sharepoint.com/_layouts/15/appregnew.aspx.- Click the buttons to generate both a Client Id as well as a Client Secret.
- Select the Client Id value, copy the text and store the value somewhere safe to be used in later steps in this guide.
- Select the Client Secret value, copy the text and store the value somewhere safe to be used in later steps in this guide.
- Now you need to grant permissions to newly registered app (AKA principal). Navigate to
https://mytenant-admin.sharepoint.com/_layouts/15/appinv.aspx.
It’s important to note the addition of “-admin” to your site's normal name.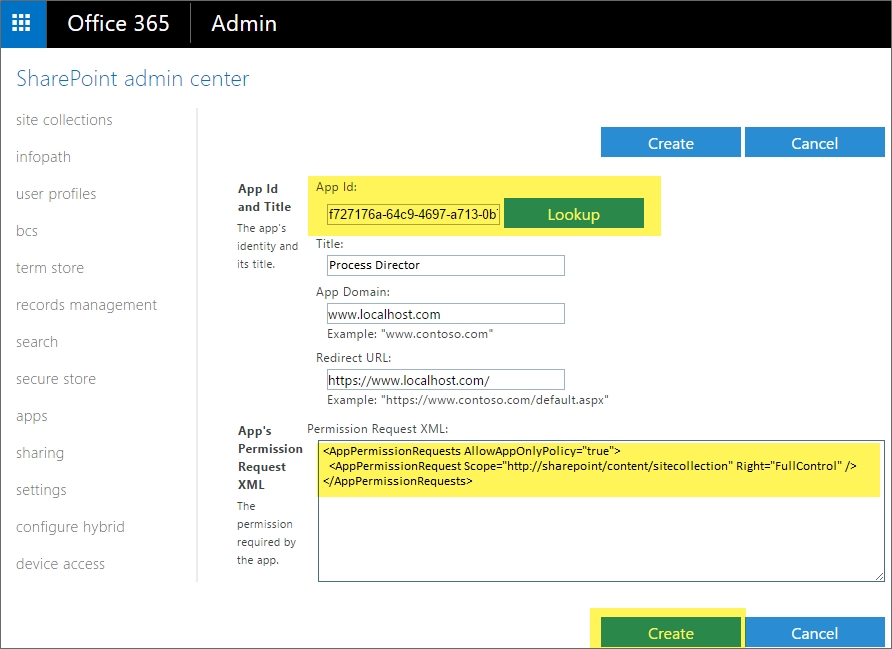
- Add your Client Id as App Id.
- Add the XML as shown, reproduced here to aid in copy and paste. Note, there are other, more restrictive options that can be considered listed in Table 1 at Microsoft's documentation topic, Add-in permissions in SharePoint. Be careful using other values as it may prevent Process Director from working correctly.
<AppPermissionRequests AllowAppOnlyPolicy="true">
     <AppPermissionRequest Scope="http://sharepoint/content/sitecollection" Right="FullControl" />
</AppPermissionRequests> - Set the Title to “Process Director”.
- Set App Domain to the fully qualified domain name of you Process Director deployment.
- Set the Redirect URL to the URL of your Process Director deployment.
- Click Create.
- Click Trust It in the follow-up prompt.
-
In a Process Director Content List folder, select Data Source from the Create New menu.
-
Supply a Name and click OK to open the new Datasource definition.
-
Set the Datasource Type drop-down to "SharePoint OAuth (Site)".
-
Add the SharePoint Site URL for your SharePoint Online installation.
-
Add the Client ID (AKA Application Id) and Client Secret from SharePoint that you set aside in the steps for Configure SharePoint Site Permissions above.
-
Click OK then select the Update item from the OK menu at the top right corner of the page to save the configuration.
-
Click theTest Connection button to test your connection to the SharePoint site.
A successful test means that your Datasource is correctly configured and is connecting to the SharePoint site correctly.
Assuming that you've correctly followed the instructions above, you've now configured both SharePoint Online and Process Director. You can now use this Datasource and the SharePoint Custom Tasks in Process Director to integrate your SharePoint sites and data with Process Director.
Sharepoint Legacy Datasource #
For connections to pre-OAuth versions of SharePoint, the SharePoint Legacy datasource type enables you to create a datasource connection to the SharePoint server.
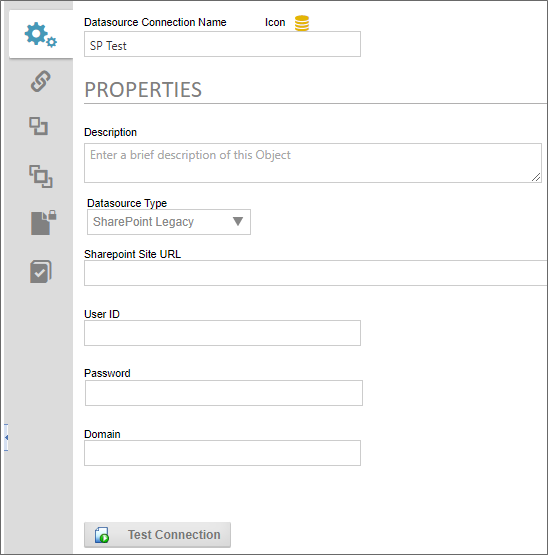
There are four properties to configure to create this datasource.
The Sharepoint Site URL property enables you to enter the fully qualified URL of the Sharepoint server to which you wish to connect.
The User ID must be the user ID for a valid SharePoint User, while the Password property will be the password for the specified user. The Domain property is the SharePoint domain that contains the specified user.
Once you've configured the datasource, you can click the Test Connection button and a message banner will appear, notifying you whether the connection was successful.
Other Datasource Types
To see more information about different Datasource Types and their configuration, please refer top the following topics:
Documentation Feedback and Questions
If you notice some way that this document can be improved, we're happy to hear your suggestions. Similarly, if you can't find an answer you're looking for, ask it via feedback. Simply click on the button below to provide us with your feedback or ask a question. Please remember, though, that not every issue can be addressed through documentation. So, if you have a specific technical issue with Process Director, please open a support ticket.

