Related Topics
There are a number of Best Practices that you should incorporate into your implementation projects. Following these guidelines will make your implementations work more smoothly, be easier to maintain, and will enable you to make necessary changes more quickly, as personnel or processes change and evolve. In addition to these best practices, you should also familiarize yourself with the basic design concepts that are explained in the Getting Started Guide.
- When you delete a form instance, ensure that you delete the corresponding Process Timeline instance as well.
- Always attach objects as Process references instead of Form references, except in those cases where a form-specific attachment is required. Always use a Group Name for attachments. The Group Name is the only reliable handle we have for selecting attached objects.
- As a general rule, you should create only one Datasource per database back end, and reuse that Datasource for all relevant implementation projects. Only create multiple Datasources when a) you are pointing to two or more databases, or b) You want to specifically restrict a Datasource to specific objects. For example, you might create a Datasource with a smaller subset of tables for use in a specific project, to ensure a class of users don't have access to more sensitive tables that might be included in the main Datasource.
- Organize Datasources in root folders of the partition, separate from any implementation folders, so that implementers don't have to export Datasources when the implementation is exported from development to production. Exports and Imports are name-based, and relative folder position-based. Consequently, the root folder containing database sources should be mirrored on development and production servers, so that both the names and relative folder positions are exactly the same in both environments. If the mirroring is correct, implementations will be imported/exported between development and production without losing contact with the Datasources.
- When creating conditions that require a specific value, use the "equals" (=) condition rather than the "contains" condition when possible. Only use 'contains' when a null value is desired as a return proxy for "show me everything" When building conditions testing matching strings, think hard about when to use “=” versus “contains”. Note that if the right hand side of the condition is blank, then “contains” will match all strings, whereas “=” will match none. If you're building a condition, for example, testing the result of a Process Timeline Activity, and the result might be “Accept” or “Do Not Accept”, then using a condition like “contains ‘accept’” will match either result—probably not what you intended. So it’s also a good idea to avoid results that are substrings of one another, like "Approve" and "Disapprove".
- When configuring Process Timeline activities, enter actual instructions in the Instructions property, and descriptions into the Description property.
- When creating new applications, place all of the application's objects, i.e., Forms, Process Timelines, etc., into a single parent folder. This makes importing/exporting applications between development and production environments much easier, as described in the Importing/Exporting Content topic of the Implementer's guide.
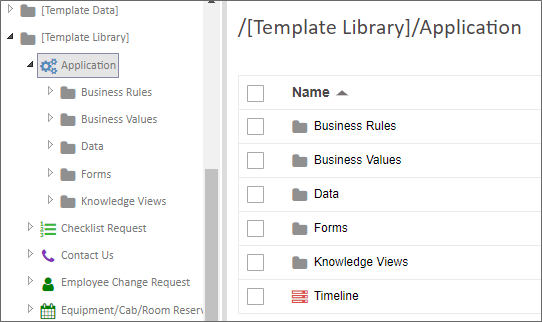
- Create an application stub in the Template Library that contains all of the base objects you'd normally create for any new application, e.g., a Form and Process Timeline that are correctly linked, along with a default email template. This enables you to provide all of the initial applications objects, along with any desired Form styling or layout, to enable all new applications to inherit a desired look and feel. This stub should also include the common organizational folders for applications objects, such as Knowledge Views, Forms, etc. Create new applications directly from this stub. The example below shows an application stub built into the Template Library.

- As a guideline, use fewer email templates by using conditional sections and multiple email data controls, when applicable.
- Use system variables to display activity names, instructions, and descriptions, rather than hard-coding them in the body of the email, so that little customization has to be done to the email template.
- Configure a default email template in the Process Timeline definition. You can override it and use a different email template if a particular Timeline Activity requires it, by configuring the Using Email Template property on the activity's Notifications tab.
- Use the
{EMAIL USER}System Variable to specify the email recipient instead of{CURR_USER}. Email messages do not have a Current User context. - On Forms, use the System Variable Control rather than typing System Variables as text into the Online Form Designer. IT makes the Form's design look cleaner, and protects against inadvertent editing of the System Variable name.
- Your Development and Staging systems should be near-replicas of your productions system, including the same users, Meta Data, etc. Global objects, such as Datasource objects should have the same names, and be in the same folder locations on all environments, though they may not be otherwise configured the same. For instance, an "Employee" datasource might connect to real-time data in an employee database on the production system, but a sanitized database on a development system. But, as long as the two objects have the same name, and are stored in the same file location on both servers, imported applications that refer to these objects will import correctly, and return the appropriate data on each system.
- Datasource objects, by the way, should not be imported between systems. They should be manually created on each system.
- When developing, use real users as assignees for Timeline activities. In testing, use impersonation to perform the assignees' tasks. Do not assign tasks to yourself, as you need to see the process as the actual assignees will see the process.
- In field properties for Process Timeline activities, enter actual instructions in the Instructions field, and descriptions into the Description field. (Remember, somebody else might be modifying this project after you—help them out!)
- When you delete a form instance, ensure that you delete the corresponding Process Timeline instance and vice versa. Failure to do leaves orphaned objects in Process Director, i.e., Form instances without their Timelines. All related instance objects need to be deleted together.
- You shouldn't ever perform testing in the production environment, except in unusual circumstances. Applications should be rigorously tested in the development environment before being imported to Production.
- Use meaningful instance names for each form definition, by setting the Form definition's Instantiated Form Name property. By the same token, use simple, meaningful names for object and field definitions. Do not use Hungarian notation or other programming-style conventions. Names should be logical and recognizable. This is very helpful when the objects are used in other places, such as when defining conditions. Object names will appear sorted alphabetically.
- Think carefully about when the Form's data fields should be editable by users. There are two properties on the Properties tab of the Form definition that control this: Form Fields are Enabled Only When and Entire Form is read-only when. In general, Form fields should be enabled for new form instances, but disabled in all other contexts. If form information does need to be edited, specify the field that should be edited during the process, and when editing is to be allowed, via visibility conditions on the appropriate fields. Section controls are extremely helpful here, because you can place the editable controls in their own Section, and enable or disable the Section control to enable/disable its constituent controls. Similarly, once the process is complete, the entire Form should be set to read-only, so that it cannot be edited after the process has completed.

- When using tables to provide Form layout, be sure to set the Role attribute, as described here.
- Instructions should tell users to do something. For example, “Please review this form and approve or reject it using the buttons below”. Note that it’s nice to begin instructions with “Please”. Descriptions should explain something. Always use friendly names for form fields that are required, have validation rules associated with them, or may be used in Knowledge Views, so that Knowledge Views and other derived uses of the field display human-friendly field names. Keep in mind that Knowledge View column titles will use the friendly name, so brevity is important, as a friendly name like "This is the name of the user who filled out this form" might not be the best choice.
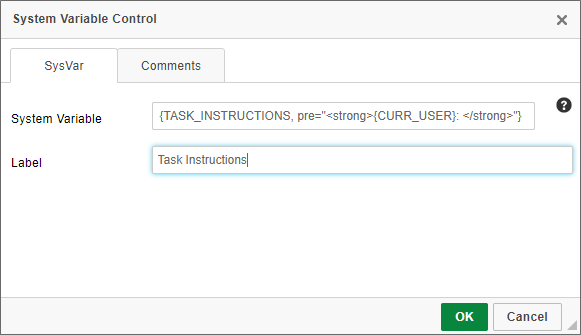
- Always add the assigned user and task instructions at the top of forms and email templates. In a task context; the easiest way to be sure of that is to use the System Variable control, and set it to use the Task Instructions System Variable, which only appears in that context. You can append the task user's name to the control by typing "
{curr_user}:" in the "Pre" formatter of the variable's attributes, as shown below.
- As a guideline, on each Form template, there should be three standard fields: the form submitter, submission date, and a unique request number. The three fields should be disabled for all users. In some cases, the submitter may be submitting on behalf of another user: those fields should be separate, so that the submitter is always automatically set (usually by setting its default value to Form Submitter), and the on-behalf-of user can be selected by the submitter using a user picker or other mechanism. The unique request number can be set via the use of the Sequence Number System Variable. It's best to set this value in the very first activity of the Process Timeline, so the Sequence Number is generated only after the Form has been submitted.
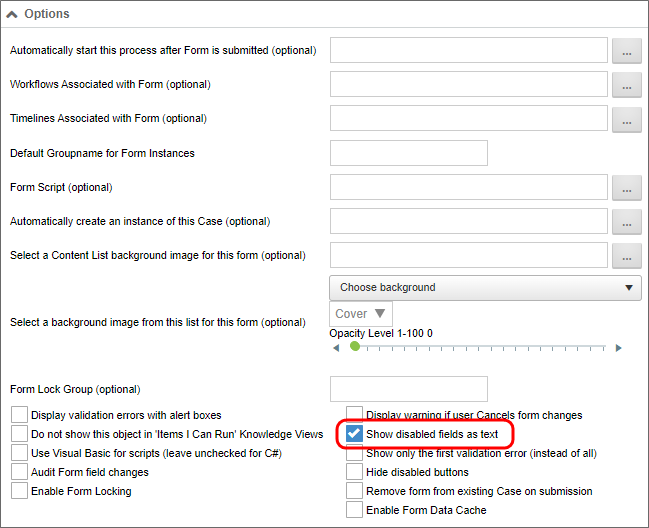
- When possible, choose the Show disabled fields as text option in the Form definition, which will render disabled fields as plain text, rather than disabled controls.

- Form control appearance logic can be complicated. The following rules should apply:
- Think about when form control appearance logic should be implemented within a Business Rule, rather than rather than explicitly defined within the field properties. As a rule of thumb, consider a Business Rule when there are three or more conditions controlling the field's appearance, or when the same appearance logic is used on multiple fields. This is true of task assignment in general as well. If you put the assigned user in a Business Rule, you can more easily find and change the user later, as users often change in the course of regular promotions and attrition. Don’t name the Business Rule after the person, but rather, the role the person plays in that Process.
- Do not tie a specific user to the appearance logic for a field unless absolutely necessary.
- Avoid using the "Step Running" condition for appearance logic, because the fields you desire to show or hide will only be shown or hidden while that specific activity is running. In all probability, the actual condition you wish to use is "Step Reached", because you wish the fields to be available when the process reaches a specific point, and at all points in the process thereafter. It’s very common to have form control logic (enabled/disabled, visible/hidden, required/optional) driven by the state of the process, and the context in which the user is viewing that form (i.e., whether the user is in a task or not). As a general guideline, use “Activity Reached” when you want appearance based on whether or not the process has reached a certain point, and use “Task Name =” when you want appearance based on whether the user is interacting with the form in the context of a specific task assigned to that user.
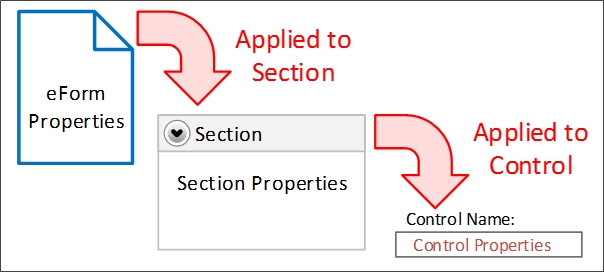
- Appearance logic is strongly driven by inheritance. Inheritance is the ability of a container control to automatically incorporate, or inherit, properties of its parent container control. In the case of Form controls, for example, the "required" and "enabled" properties are inherited. The Form is the highest-level container control, and every control on the form is a child control of the Form. A Section control placed onto a Form will inherit the properties of the Form, while an individual control placed inside of a Section control will, in turn, inherit the section's properties.

For example, if the Required property of a Section control is set to "true", then inheritance ensures that all of the controls contained in that section will be required. You can override inheritance, however, by explicitly setting the Required property of a control inside the section to "False". If there is conflict between the Required property of a container control, and the controls contained inside it, the control property at the lowest level wins, and overrides the inheritance. With the "lowest level wins" model of inheritance in mind:
- Disable forms when the form isn't a new instance, then enable individual sections as necessary for data input in succeeding activities.
- Do not use the Otherwise disabled or Otherwise enabled conditional appearance settings in field properties unless you specifically want to override the appearance logic for the parent container in all cases.
- Setting a control to "Otherwise Xxxxx" when the parent container has its own appearance logic can result in unexpected behavior when the parent container's appearance logic conflicts with that of the control.
- Label control values don't get saved to the database; therefore, labels should be used only to show text on forms. Label controls are display vehicles only; don’t try to use them in conditions, for example. When possible, associate each label with an Input control for Accessibility compliance.
- Hide debug sections and other development conventions in forms from the non-developer form users. Users should never see anything on a form that isn't relevant to the process on which they are working.
- The Routing Slip should appear below any user action buttons so that users don't have to scroll below the Routing Slip to perform their assigned task.
- Use the branch/result order properties to ensure that options are presented consistently to users throughout a process. approvals are always displayed first in the button areas.
- Sequence numbers should always be formatted as text, and should always use the "digits" formatter. There are a couple of reasons for this.
- First, there's a general rule that, if you aren't going to do math on a data item, it's not actually a number, even if all of the characters are numeric. This is why zip codes, or social security numbers are always formatted as text. Additionally, if a data item is formatted as a number, then you can't use the "Contains" operator in the Condition Builder, and can only use the "=" operator. This limitation can be troublesome, because if you leave the value blank in, say, a Knowledge View filter condition that uses the "=" operator, Process Director returns no results, but leaving a "contains" condition blank returns all results. Most of the time, you want to return all results as a default, and then allow the user to filter the results to a smaller set by entering a value for the sequence number, which requires using the "contains" operator in the filter.
- Formatting the sequence number as text, of course, changes the way sorting works. A numeric field is sorted in numerical order, while a text field is sorted alphabetically, so the same set of sequence numbers will be sorted in different order, depending on whether they are text or numeric data.
NUMERIC SORTING ALPHABETIC SORTING 1 1 2 100 11 11 21 2 100 21
- This is where the "digits" formatter for the sequence number comes in. If you set the digits formatter to "digits=4", the sequence number will always be a fixed length of four digits, and will use leading zeros for smaller numbers, so that sequence number "1" will be stored as "0001". Adding the leading zeros will fix the Alphabetic sorting issue, so that you can sort by the sequence number in the expected order, e.g., 0001, 0002, 0011, 0021, 0100.
In general, you should always return Form Instances with Knowledge Views unless you have a specific reason to return other objects such as Attachments, Timeline Instances, etc. This is especially true if you are creating filters that use the value of some form field for filtering. Returning, say, Timeline Instances will cause your filter criterion to fail, whereas form field filters will work as expected when returning Form Instances.
- For the purposes of this discussion, we'll refer to Business Rules, Business Values, and Goals collectively as "value objects", since they primarily return a value or values. These value objects occupy a slightly different space than other Process Director objects. Most objects, like Forms or Timelines, are tied to a specific implementation project. Conversely, value objects are often not tied to a specific project at all. For instance, a Business Value that extracts some data from an external ERP or CRM system may be widely used across a number of projects. Similarly, a Goal that specifies some universal system state may be used by all projects. On the other hand, a Business Rule might return a global value that is not tied to a specific application, while a different Business Rule might not work outside the context of a specific Form or Process Timeline definition. This configuration issue raises the question of where the value objects should be placed in the Content List, and when—or if-—they should be exported/imported between development and production systems.
- You may wish to consider whether to create a folder at the root level of the Partition to store value objects that are used by multiple projects, while storing project-centric objects within the relevant project folders. It's often quite easy to determine whether an object is project-centric or not: If the object can be used by any application, such as a Business Value, Dropdown Object, or DataSource object, it should probably be stored in a central location in the Content List, separate from any specific implementation project. BP Logix uses folder names set off with square brackets, e.g., [Business Values] to organize these global objects together in the Content List.
- Indeed, you might wish to consider this method of centralizing storage for some other objects, as well. For instance, some Business Rules may be used in multiple projects, because they have no dependency on specific forms or other application objects. These Business Rules should also be stored in a central location, while application-specific Business Rules would be stored within the application's parent folder.
Documentation Feedback and Questions
If you notice some way that this document can be improved, we're happy to hear your suggestions. Similarly, if you can't find an answer you're looking for, ask it via feedback. Simply click on the button below to provide us with your feedback or ask a question. Please remember, though, that not every issue can be addressed through documentation. So, if you have a specific technical issue with Process Director, please open a support ticket.

