Related Topics
These Custom Tasks perform various Form operations.
 Add JavaScript to Form
This Custom Task will add JavaScript to run a client-side script in the Form. This JavaScript can run on various HTML DOM events, as well as on Process Director Form events. This CT can only be configured for a Form definition. The JavaScript can include System Variables.
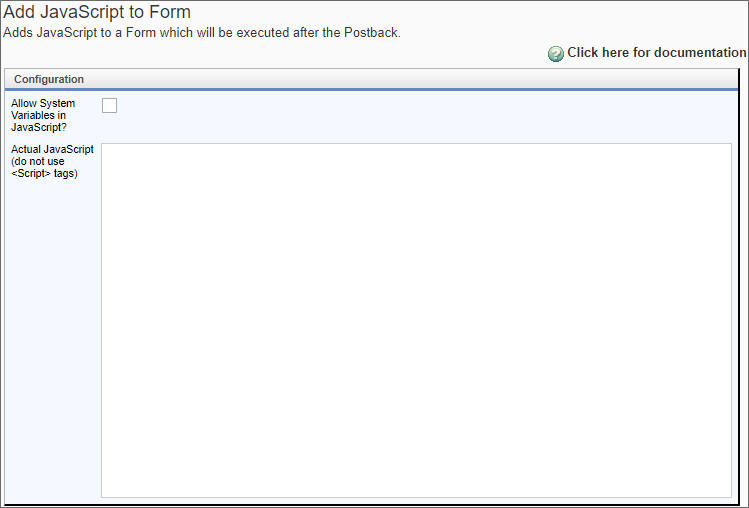
Configuration Options
|
OPTION |
ATTRIBUTES |
DESCRIPTION |
|---|---|---|
|
Allow System Variables in JavaScript? |
|
When this check box is selected, Process Director will parse the JavaScript text for System Variables and replace them with the appropriate values. |
| Actual JavaScript (don't use <Script> tags) |
|
The JavaScript code to be run by the Custom Task. Only the actual JavaScript code is inserted into this box. HTML <script> tags shouldn't be included. |
Additionally, this Custom Task solves an issue with Internet Explorer where the browser looses focus on the Form after a Set Form Data Custom Task is run. Simply insert the following JavaScript line in the JavaScript text box:
bpSetWindowFocus();
Set this Custom Task to run immediately after the Set Form Data Custom Task to reapply focus to the Form.
 Advanced Show Alert
This Custom Task will show an Alert Box on a form, and enables you to configure several advanced options for the appearance and function of the Alert Box.

Configuration Options
|
OPTION |
ATTRIBUTES |
DESCRIPTION |
|---|---|---|
|
Alert Caption |
|
The title text to display for the Alert. This property may contain system Variables. |
| Alert Text |
|
The main message text to display. |
| Alert Icon | None Info Success Warning Error Question Or User-Supplied Value |
The Icon to display on the Alert Box. You can select a standard item from the Dropdown control, or use the Text box to supply an icon via the {ICON} system variable. |
| Custom Alert Icon Primary | For v2025.04.29 and higher of the Custom Task, this property enables you to use the Icon Picker to select an icon and it's color to display as the primary icon for the alert box, when checked. An additional property, Icon Size (px), will also appear to enable you to specify the size, in pixels, at which the icon will display. | |
| Custom Alert Icon Secondary | For v2025.04.29 and higher of the Custom Task, this property enables you to use the Icon Picker to select an icon and it's color to display as the primary icon for the alert box, when checked. An additional property, Icon Size (px), will also appear to enable you to specify the size, in pixels, at which the icon will display. | |
| Footer Text | Text to display in the footer of the Alert Box. | |
| Position | Center (Default) Center-Start Center-End Top Top-Start Top-End Bottom Bottom-Start Bottom-End |
Sets the display location of the Alert Box |
| Can the alert grow in size | No (Default) Grow by Row Grow by Column Full Screen |
Determines the Alert Box resizing mode. "Grow by Row" extends the Alert box to the full horizontal width of the screen, "Grow by Column" to the full vertical width, and "Full Screen" covers the entire display. |
| Auto close pop-up in (milliseconds) | For v2025.04.29 and higher of the Custom Task, this property enables you to enter the number of milliseconds to display the alert box, after which it will close. For example, setting the property to 5000 will display the alert box for five seconds. |
|
| Show Confirm Button | When checked, will display a confirmation button in the Alert Box. | |
| Confirm Button Text | The caption to display on the confirmation button. | |
| Color | Sets the background color of the confirmation button, using an HTML named color or hexadecimal decimal value. e.g., blue or #082f4d. |
|
| Form button to click after Confirm | (List of Form Controls) | A Form Button control to automatically click after clicking the confirmation button. The Form Button must be visible. |
| Show Cancel Button | When checked, will display a cancel button in the Alert Box. | |
| Cancel Button Text | The caption to display on the cancel button. | |
| Cancel Button Color | Sets the background color of the cancel button, using an HTML named color or hexadecimal value. e.g., blue or #082f4d. |
|
| Reverse Confirm and Cancel button display order | By default, the confirmation button appears on the left, and the cancel button on the right. Setting this property to checked will reverse that order. | |
| Image URL | The URL of an image to display in the Alert Box. The image will display between the Icon and the Alert Caption. | |
| Image Height/Width |
The height and width of the image, in pixels, to display. Leaving these setting blank will automatically resize the image to display it with the original aspect ratio.
|
|
| Close form when alert closes |
When checked, the Form instance will close automatically after the Alert Box closes.
|
|
| Input Type | None (default) Alert Text: Password Number Telephone Text Area Checkbox |
The property, when set to other than "None" will display an input control of the selected type in the Alter box, below the Alert Text. The selected Input Type will also validate user entry to conform properly to the Input Type selected, e.g., selecting "Email" will require the input to be entered in a valid email address format. |
| Input field empty text | Sets the text to display as Empty Text in the Alert Box input field when no value is set, i.e., when the user will supply a value. If the selected Input Type is a checkbox, this property will be used as the display text for the Checkbox. | |
| Input field initial value | Sets the initial value of the Alert Box input field. If a value is set, the Empty Text won't display. | |
| Input target control for input | (List of Form Controls) | Enables you to select a form field into which the value of the Alert Box input field will be copied after the Alert Box is closed. |
| Test Alert | For v2025.04.29 and higher of the Custom Task, this button, when clicked, will display a preview of the alert box as it is currently configured. |
 Fill Dropdown from Form Data
This Form Custom Task will fill a Dropdown control on a form with the Form field values of an array contained on the Form. If called after adding or removing rows from the array, the available options in the Dropdown will change. Be advised that if the value of the Dropdown is set to an option that is subsequently removed from the array, the value will be orphaned from the updated options, which could result in unexpected behavior.
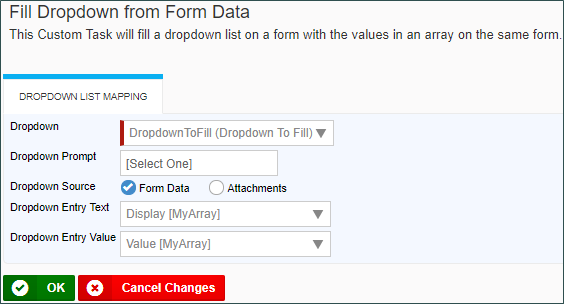
Configuration Options
|
OPTION |
ATTRIBUTES |
DESCRIPTION |
|---|---|---|
|
Dropdown |
(List of Form Controls) |
Select the target dropdown control that will use the form data. |
|
Dropdown Prompt |
|
The initial prompt you'd like the user to see in the dropdown. |
| Dropdown Source | Form Data Attachments |
You can choose the source for the dropdown data. If you select form data, you can select the form array that contains the data. If you select Attachments, you can select which attachment property you wish to display in the dropdown. |
| Dropdown Entry Text | A list of array fields or attachment properties | The data you wish to display as the text of the dropdown options. |
| Dropdown Entry Value | A list of array fields or attachment properties | The data you wish to display as the value that will be saved with the dropdown control. |
 Decrypt Files
This Custom Task will provide decryption for files attached to a Form or process, where the encryption/decryption method is known. Once decrypted, the files are then attached to the Form/Process automatically.
 Because this Custom Task requires additional cryptographic components to be installed with Process Director, it is compatible only with v6.1.313 and higher.

To configure this Custom Task, you must have a Compliance Datasource object on your system that specifies the Private Key Value and Pass phrase value for the method that was used to encrypt the file. Only system administrators should have direct access to view or edit this datasource object.
The Compliance Datasource will need to have the appropriate values added to store the Private Key and Pass Phrase for the encryption, e.g.:
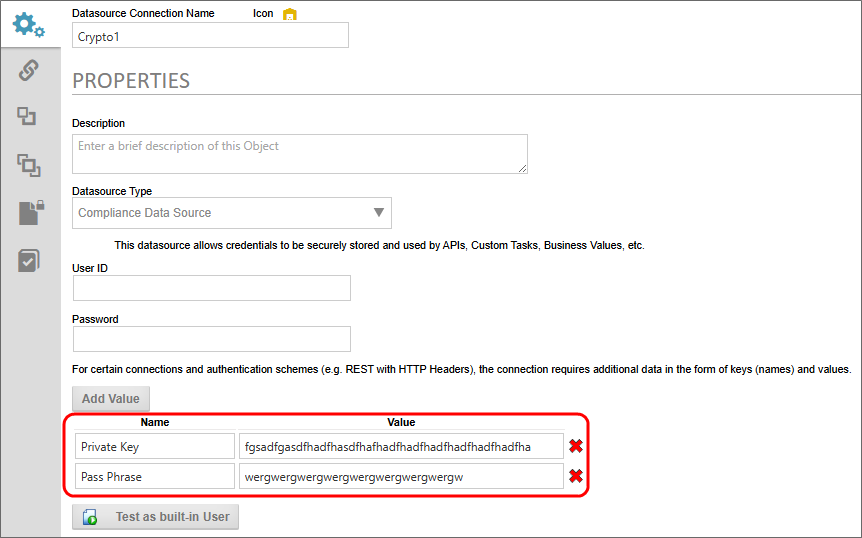
The Custom Task cannot be configured if the Compliance Datasource does not exist, or if it does not contain the appropriate attributes. Attempting to configure this Custom Task in any version below Process Director v6.1.313 will result in an error message.
Configuration Options
|
OPTION |
ATTRIBUTES |
DESCRIPTION |
|---|---|---|
|
Select a Private Key Compliance Data Source |
(List of Compliance Datasources) |
Enables you to select the Compliance Datasource object that contains the correct Private Key and Pass Phrase to decrypt the document. Once selected, the two properties below will appear on the page. |
|
Private Key Value Name |
(List of Datasource Attributes) |
Selection to choose the attribute that specifies the Private Key used to encrypt the document. |
| PassPhrase Value Name |
(List of Datasource Attributes) |
Selection to choose the attribute that specifies the Pass Phrase used to encrypt the document. |
| Encrypted Items References | Current Form Only Process References Form References |
Enables you to select the attachment method used to attach the encrypted file. |
| Limit Encrypted items to a specific group | Enables you to specify the group name for the group that contains the encrypted file(s). Only items in the specified group will be decrypted. | |
| Limit Decrypted items to a specific group | Enables you to specify the group name for the decrypted files. | |
| Delete all other items in Group | When checked, all other files in this group will be deleted, and replaced by the newly-decrypted file(s). | |
| Attach Objects To | Form Process |
Enables you to specify the attachment method to use for attaching the decrypted files. |
 Form Save
This Form Custom Task will save the Form in its current state whenever it is called by an event.

The Close Form After Saving property will, when checked, close the Form after the save operation has completed.
When a Form instance has been copied, the copied instance retains the same version number of the original. In order to reset the version number of the copied, unsubmitted Form instance, the property checkbox labeled Set version to Zero if it is a copied form instance will, when checked, reset the version number of the copied Form instance to 0. This will ensure that the Form instance is not treated as a submitted instance. This property was added in v2025.09.25.
 Get geolocation
This Custom Task fills form fields with location (latitude/longitude) data derived from the browser. The fields selected must not be hidden using rules in Process Director. If you don't want the text fields visible, add the style “display:none;” to either
- The Style property of the input control in the Formatting tab of the Properties dialog box in the Online Form Designer, or
- The Set Style Options property in the Properties dialog box for the control on the Form Controls tab for the field. You can combine this style with the style “display:inline;” to conditionally make the fields visible.
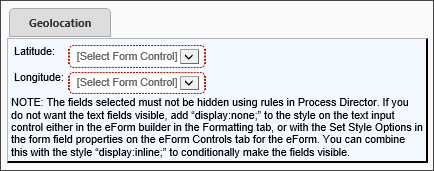
Configuration Options
|
OPTION |
ATTRIBUTES |
DESCRIPTION |
|---|---|---|
|
Latitude |
(List of Form Controls) |
Select the control that stores the latitude of the location. |
|
Longitude |
(List of Form Controls) |
Select the control that stores the longitude of the location. |
 Mobile Form Import
 This custom Task is only relevant to installations that are specifically licensed for the Mobile Application component.
This Custom Task imports data from the BP Logix Mobile Server to create Form instances for forms filled out using the BP Logix Mobile App.

Versions 2024.08.01 and newer of this Custom Task will also import mobile tasks, as part of the Mobile Task Export For User activity types introduced in Process Director v6.1.300 and higher.
Configuration Options
This Custom Task has no user-configurable options. It displays information on the last execution date for informational purposes. The configuration options needed to run this Custom Task are configured via the Mobile Application Custom Variables.
 Random Code Generator
This Custom Task generates a random code based upon a pattern, and copies the generated code into a specified Form control.

Configuration Options
|
OPTION |
ATTRIBUTES |
DESCRIPTION |
|---|---|---|
|
Code Pattern |
|
Enables you to configure the patter of the code to generate. |
|
Control to Populate |
(List of Form Controls) |
Selects the Form control that stores the generated code. |
Configuring the Code Pattern
The code generated by this Custom Task will conform to the specifications you configure in the Code Pattern property. You configure the desired pattern using a set of wildcard characters. The available wildcards are shown below:
|
WILDCARD |
GENERATED CODE CHARACTER |
|---|---|
| A |
An upper case letter character. |
| a | A lower case letter character. |
| ? | A special character, such as !, or ^. |
| # |
A number from 0-9. |
| 1 | A number from 1-9 (no zeroes). |
| * | Any upper or lower case letter, any number, or any special character. |
Thus, using a Code Pattern of Aa?#1* could result in the following values randomly generated from this pattern:
It!88JGe^07jYp:46QGb)260
For instance, you could set a 10-character autogenerated password using the Code Pattern **********, which might result in values such as:
ueL;5('*6qe@s=Udsu86j<#q;7ra`%- ...and so forth.
 Set Focus
This Custom Task enables designers to determine which Form field should have the focus after a Form field event is fired. Form field events generally cause a page refresh, during which control focus is lost. Losing the control focus restarts the Form's tab order at the beginning.
For example, you may wish to prompt a calculation on the value of two Form fields, FieldA and FieldB, any time the value of either field changes. You could then run this Custom Task on the FieldA event to set the focus to the FieldB control, which would be next in the normal tab order. Similarly, on the event for FieldB, you would run this Custom Task to set the focus on whatever field would normally come next in the tab order for the form.
By default, controls are automatically sorted into tab order from left to right then from top to bottom. Process Director does not enable you to specify a custom tab order for Form controls.
The Set Focus Custom Task will reset the Form's control focus to the field configured by the designer.

To configure the Custom Task, set the Form Control property to the field that should receive focus after the Form control event fires. This Custom Task can only be configured in a Form definition.
 Show Alert
This Custom Task will show a JavaScript alert box on a Form. You can specify the Title, text and icon that are displayed in the alert box.

Configuration Options
|
OPTION |
ATTRIBUTES |
DESCRIPTION |
|---|---|---|
| Alert Caption | The text that will appear as the header text for the alert box. This is a required field. | |
| Alert Text | Additional text to display below the caption of the alert box. | |
| Alert Icon | [Select Icon or Enter Sysvar] None Info Success Warning Error |
In nearly every case, you should simply select the desired icon from the dropdown. If [Select Icon or Enter Sysvar] is selected, you may enter the system variable for a form field that returns the values "Info", "Success", etc., in the text box provided. You can't use a custom icon system variable for this value. It must be one of the five values that appear in the dropdown. |
| Test Alert | Clicking the button will display the alert box, so that you can see it while configuring the Custom Task. |
 A move away from using a JavaScript alert was made for technical reasons. This change was necessary though it prevents the Show Alert CT from showing a message when a form completes. At present there is no way to show a message when a form completes.
This Custom Task can only be configured in a Form definition.
 Show Map on Form
This Custom Task will place a map image on a Form when given a set of coordinates. For the map to persist on the Form, you must map this Custom Task to the [Form Display] Event. The creation and display of the Map image is dynamic, so refreshing the page will always remove the map image until the Custom Task is called again. Setting this custom task to the [Form Display] event ensures the map image is regenerated any time a form event fires and refreshes the page.
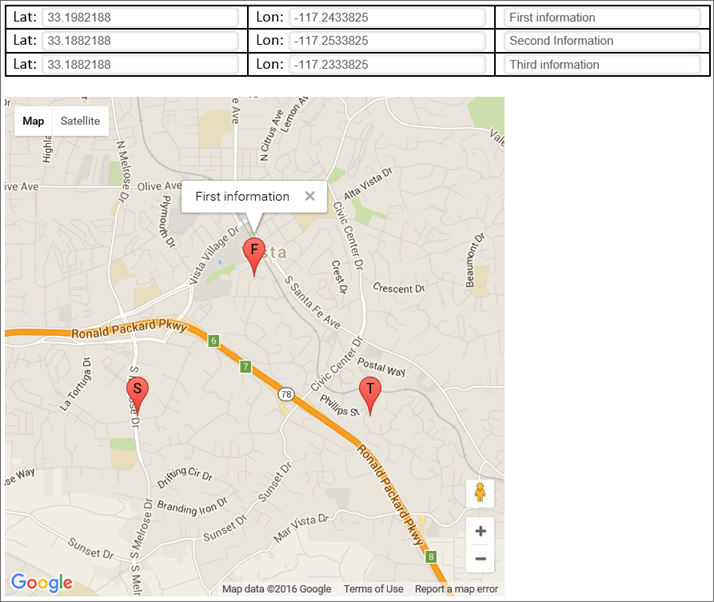
The Custom Task also enables you to add multiple markers to a map. If you set the Latitude and Longitude properties to an array field, Process director will automatically display a marker for each row in the array.
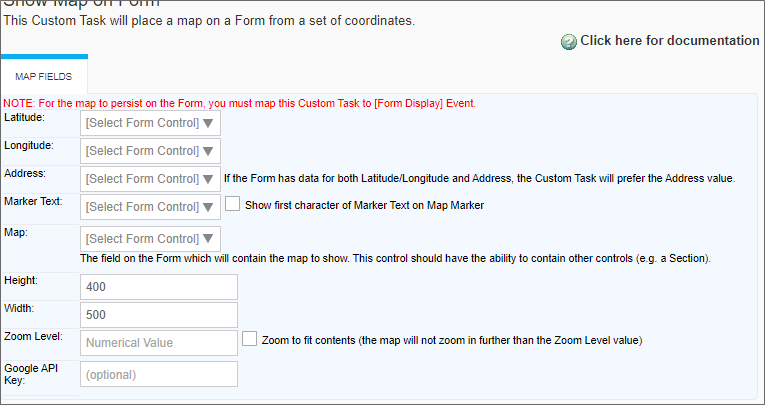
Configuration Options
|
OPTION |
ATTRIBUTES |
DESCRIPTION |
|---|---|---|
|
Latitude |
(List of Form Controls) |
Select the control that stores the latitude of the location. |
|
Longitude |
(List of Form Controls) |
Select the control that stores the longitude of the location. |
|
Address |
(List of Form Controls) |
Select the control that stores the address of the location. |
| Marker Text | (List of Form Controls) | A control that contains the text that you'd like to appear in a pop-up box when you click on the marker. |
|
Map |
(List of Form Controls) |
The field on the Form which will contain the map to show. This control should have the ability to contain other controls (e.g. a Section). |
|
Height |
|
The map's desired height. |
|
Width |
|
The map's desired width. |
| Zoom Level | Can be set from 1 to 25, with 25 being the highest zoom level. | |
| Zoom to Fit Contents | When checked, if multiple coordinates are entered, the zoom level will automatically set to a level that shows all of the coordinates that have been set. | |
| Google API Key | Optional Google API key to use so that map views can be tracked through the Google Maps administrative console for your account. |
 Multiple locations can be marked by using an array control to set the Latitude, Longitude, Address, and Marker Text settings. See the example below.
 Validate Form
This Custom Task runs Form validation before attempting to submit the Form. Normally, Form field values are only validated when the Form is submitted. This Custom task enables you to run Form field validation whenever you choose. For example, if the value of FieldA determines the options that might be displayed in a Dropdown control, you might want to run this Custom Task on the FieldA event to ensure the value in FieldA is valid before allowing the user to continue filling out the Form. If the Form does not validate, the appropriate validation error messages will be displayed to the user.
You may choose to validate the entire form or, for Custom Task v2019.09.16 and higher, only fields within a specified container control, like a Section or TabStrip control.
 The use of v2019.09.16 or higher of this Custom Task requires Process Director v5.26 or higher.
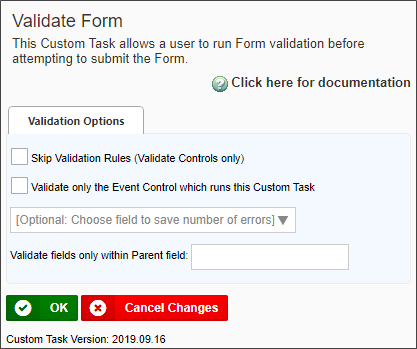
Configuration Options
|
OPTION |
ATTRIBUTES |
DESCRIPTION |
|---|---|---|
|
Skip Validation Rules (Validate Controls only) |
|
Skip all of the form validation rules. |
|
Validate only the Event Control which runs this Custom Task |
|
Validate on the control that runs the Custom Task. |
|
Optional: Choose field to save the number of errors |
(List of Form Controls) |
Select the control that stores the number of validation errors that are thrown. |
| Validate Fields Only within Parent Field | An input box that will accept the name of a valid container control, e.g., a Section. |
 Validate Form Field
This Custom Task will validate a form field using a Regular Expression. Only the specified Form field will be validated, and the validation will only check to ensure that the value of the Form field matches the specified Regular Expression. This Custom Task does not substitute for or interfere with, normal Form validation.

Configuration Options
|
OPTION |
ATTRIBUTES |
DESCRIPTION |
|---|---|---|
|
Form Control |
(List of Form Controls) |
The form control to validate |
|
Regular Expression |
|
The Regular expression to use to validate the form control. |
|
Convert SysVars in Regular Expression |
|
Convert any SysVars used in the Regular Expression to their values prior to validating the form field. |
|
Error message |
Error if the text doesn't match the regular expression, Error if the text does match the regular expression |
Choose whether the message displays when the regular expression matches or not. |
|
Enter the optional error message |
|
A customized error message to display. |
Documentation Feedback and Questions
If you notice some way that this document can be improved, we're happy to hear your suggestions. Similarly, if you can't find an answer you're looking for, ask it via feedback. Simply click on the button below to provide us with your feedback or ask a question. Please remember, though, that not every issue can be addressed through documentation. So, if you have a specific technical issue with Process Director, please open a support ticket.

